
TABLE OF CONTENTS
- 1. Overview and capabilities
- 2. Prerequisites and ownership
- 3. End-to-end setup
- 4. Configure notification routing
- 5. Test the integration
- 6. Recommended routing patterns
- 7. Troubleshooting
- 8. Frequently asked questions
- Can different events be sent to different Teams channels?
- Can one event be sent to more than one place?
- What is a relative recipient?
- Why is user mapping required?
- Does adding the app to one channel add it everywhere?
- Can a customer use a personal Microsoft Teams account?
- Can users open the Zomentum document from Teams?
- Can approvals be completed directly in Teams?
- How do we stop the integration?
- What if the UI labels are slightly different?
1. Overview and capabilities
Bring Zomentum document activity into the Microsoft Teams workspace where MSP teams already collaborate.
The Zomentum Microsoft Teams integration sends selected document lifecycle events to Teams channels, group chats, and direct messages. It helps teams respond to approvals, signatures, comments, and payments without relying only on email or in-app notifications.
What users can do
Receive Zomentum document activity notifications in a chosen Teams channel, group chat, or direct message.
Route different Zomentum events to different destinations.
Send approval requests directly to the relevant approvers and optionally to a shared approvals channel.
Open the related Zomentum document from the Teams notification.
Add an optional comment and approve or reject an approval request from the Teams card.
Map Zomentum users to their corresponding Microsoft Teams identities for direct notifications.
Supported document activity events
2. Prerequisites and ownership
Confirm the required access before starting. Most setup delays occur because the Microsoft 365 administrator is not present or custom app upload is restricted.
Required access
Before the setup call
Use a Microsoft 365 business tenant. The custom app administration flow is not available through a personal Teams account.
Identify the Microsoft 365 administrator who can upload and approve the app package.
Decide which Teams channel will receive approvals and which channel will receive payment exceptions.
List the Zomentum users who require direct messages or approval cards.
Prepare a test document and a test approval workflow.
Keep the downloaded app package as a .zip file; do not extract it before uploading.
3. End-to-end setup
Complete the four-part connection wizard, then configure Teams bindings and users.
1. In Zomentum, open Settings.
2. Go to Integrations.
3. Scroll to the Productivity section.
4. Find Microsoft Teams and select Connect.
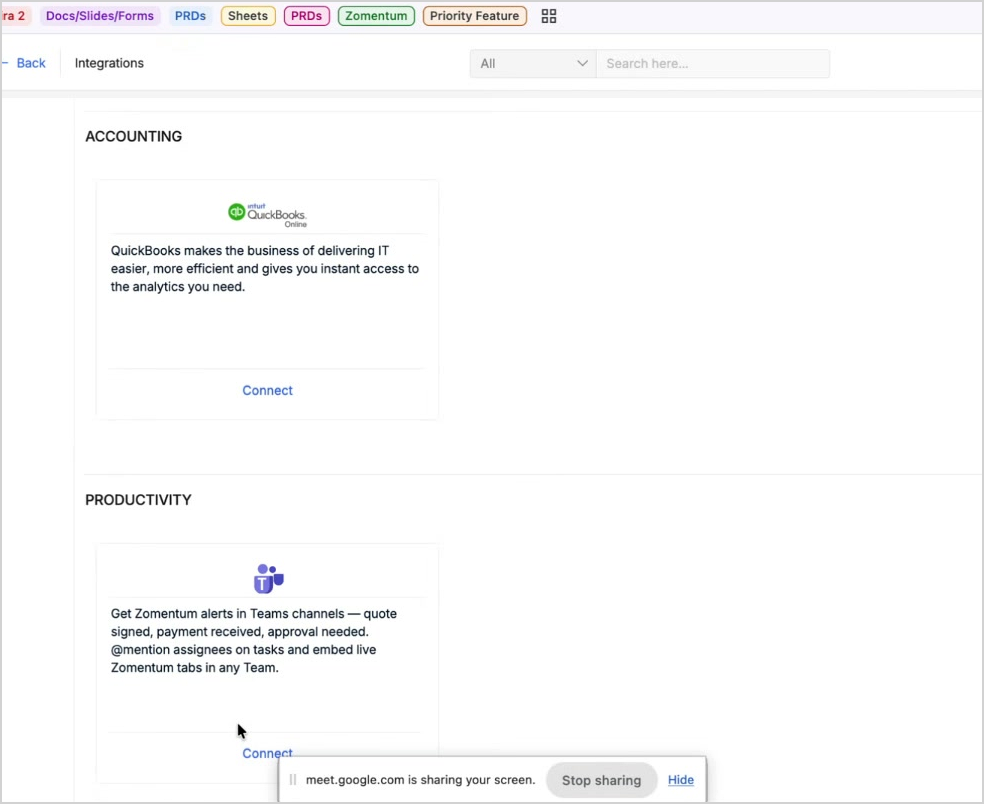
Figure 1. Microsoft Teams appears in the Productivity section of Zomentum Integrations.
The installation wizard contains four stages: Download → Side-load → Install in Teams → Enter code
1. Select Download .zip to download the Zomentum Teams app package.
2. Save the .zip file without extracting it.
3. If you do not have Microsoft 365 administrator permission, send the file to the customer’s Teams administrator.
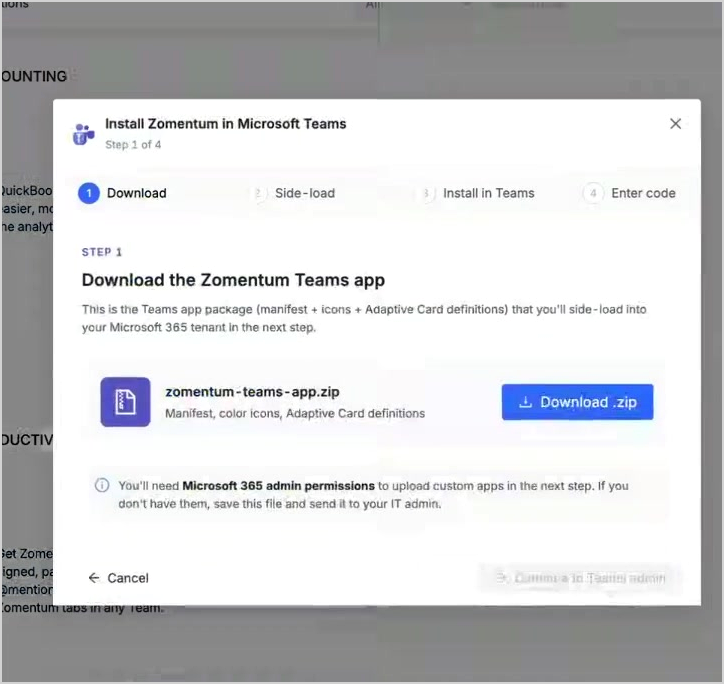
Figure 2. Download the app package from Step 1 of the Zomentum installation wizard.
1. Sign in to the Microsoft Teams admin center.
2. Open Teams apps → Manage apps.
3. Open Actions and choose the option to upload a new custom app.
4. Upload the Zomentum .zip package downloaded from Zomentum.
5. Confirm that the Zomentum app is available and not blocked for the intended users.
Admin portal: Microsoft Teams admin center
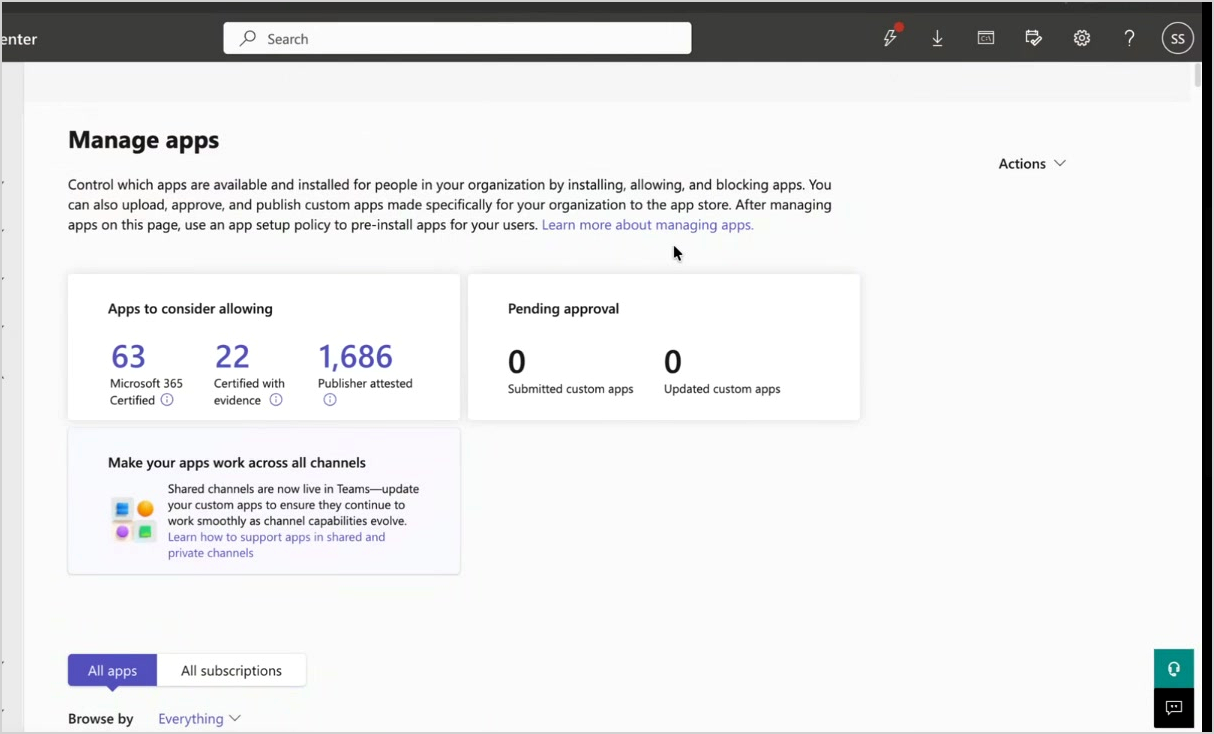
Figure 3. Teams administrators upload the custom package from Teams apps → Manage apps.
1. Open Microsoft Teams and go to Apps.
2. Look under Built for your organisation or Added by your org, or search for Zomentum.
3. Select Add or Open.
4. Choose where the app should be used: personal chat, a team channel, or a group chat.
5. When using a team, select the required channel and confirm with Go.
6. Repeat this step for each additional team, channel, or group chat that should be available as a Zomentum notification destination.
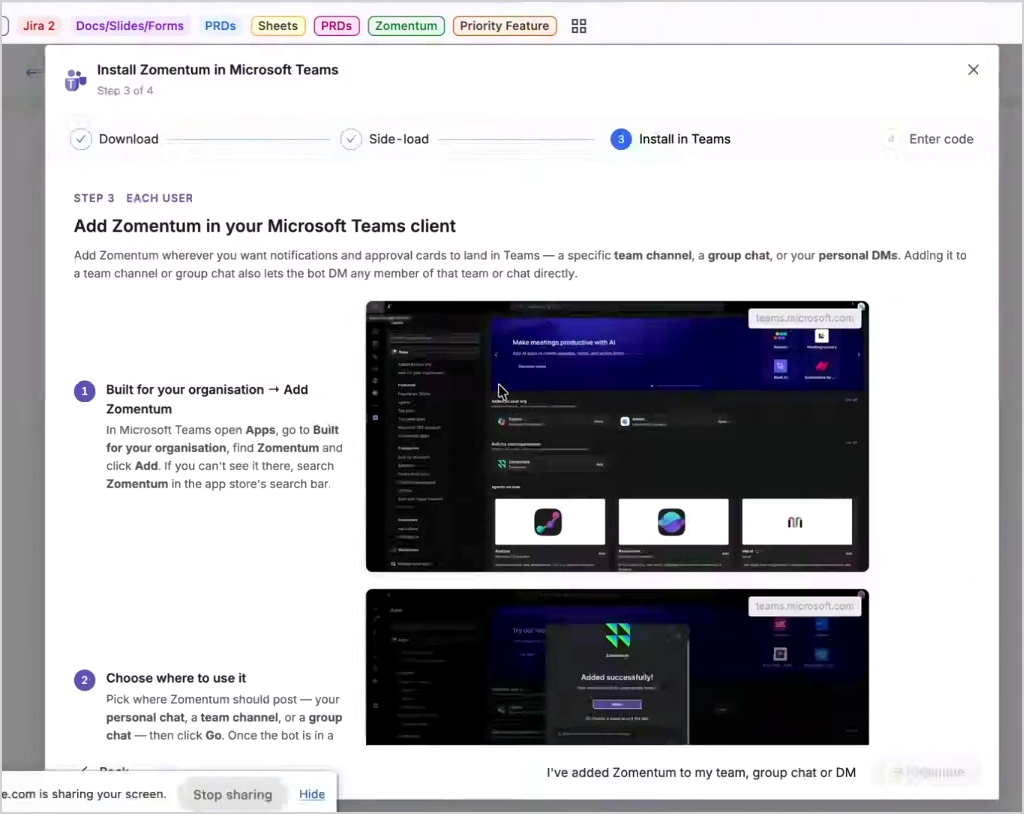
Figure 4. The Zomentum wizard explains how each user adds the app in Microsoft Teams.
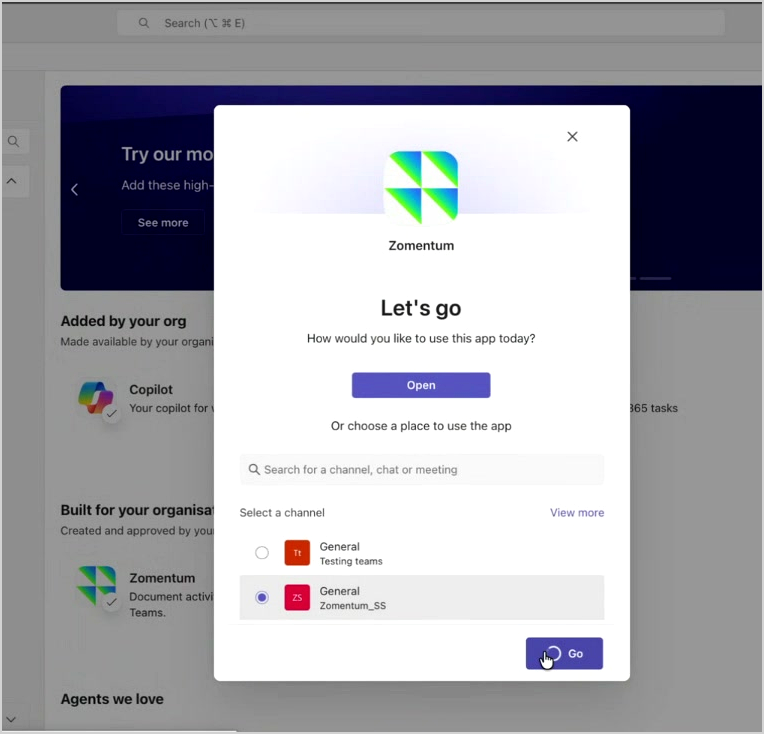
Figure 5. Select the specific Teams location where the Zomentum bot should be added.
1. After Zomentum is added in Teams, the bot sends a one-time pairing code in the selected conversation.
2. Copy the code from Teams.
3. Return to Step 4: Enter code in the Zomentum installation wizard.
4. Paste the code and select Verify code.
5. When the success message appears, select Configure channels & events.
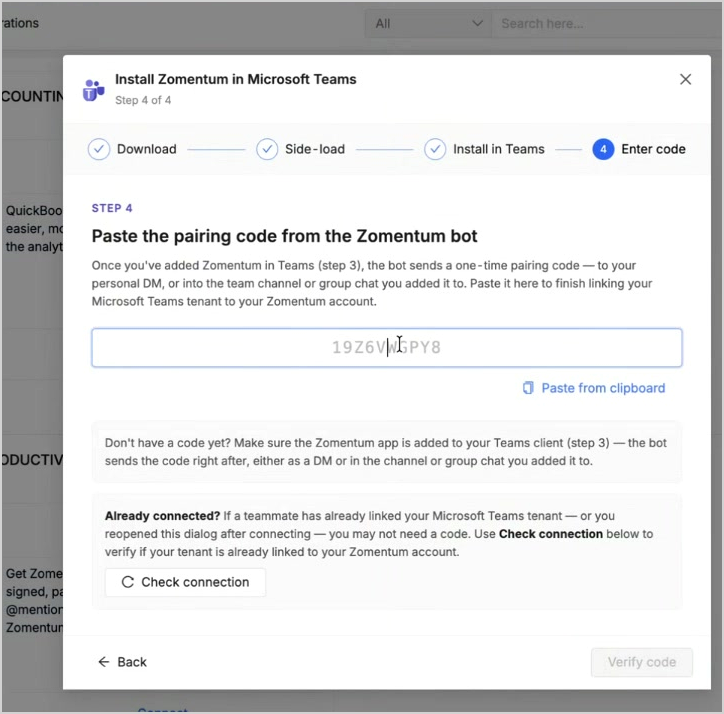
Figure 6. Paste the one-time pairing code from the Zomentum bot and verify the connection.
Open the Bindings tab. The screen contains three areas:
Teams — teams in which the Zomentum bot has been installed. The bot can post to channels within those teams.
Group Chats — group chats in which Zomentum has been installed.
User Mappings — maps each Zomentum account to the corresponding Microsoft Teams user. Linked users receive Zomentum direct messages and approval cards.
1. Confirm that the required team and group chat are listed.
2. For every user who needs direct notifications, select the matching Teams user from the mapping dropdown.
3. Check the summary at the top of the integration for the number of bound teams, bound group chats, and linked users.
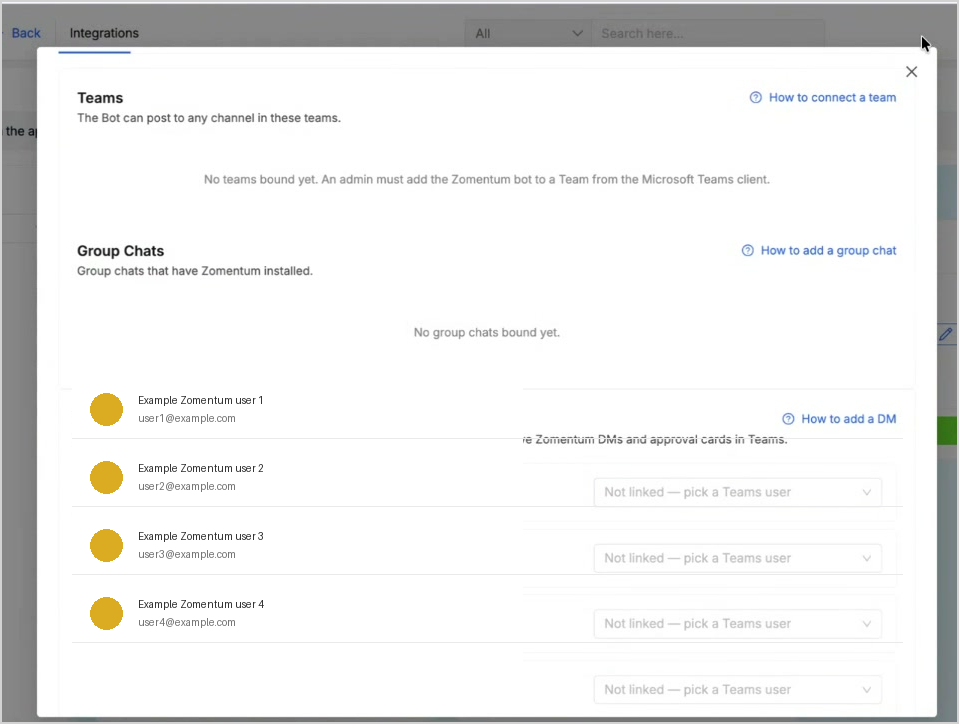
Figure 7. Bind teams and group chats, then link Zomentum users to their Teams identities. Example identities are shown.
4. Configure notification routing
Select which event should be sent and where each notification should appear.
1. Open the Microsoft Teams integration and select the Document Activity tab.
2. Turn on the toggle for each required event.
3. Under Send to, choose one or more destinations.
4. Select Save. Confirm that the “Routing rules saved” message appears.
Available destination types
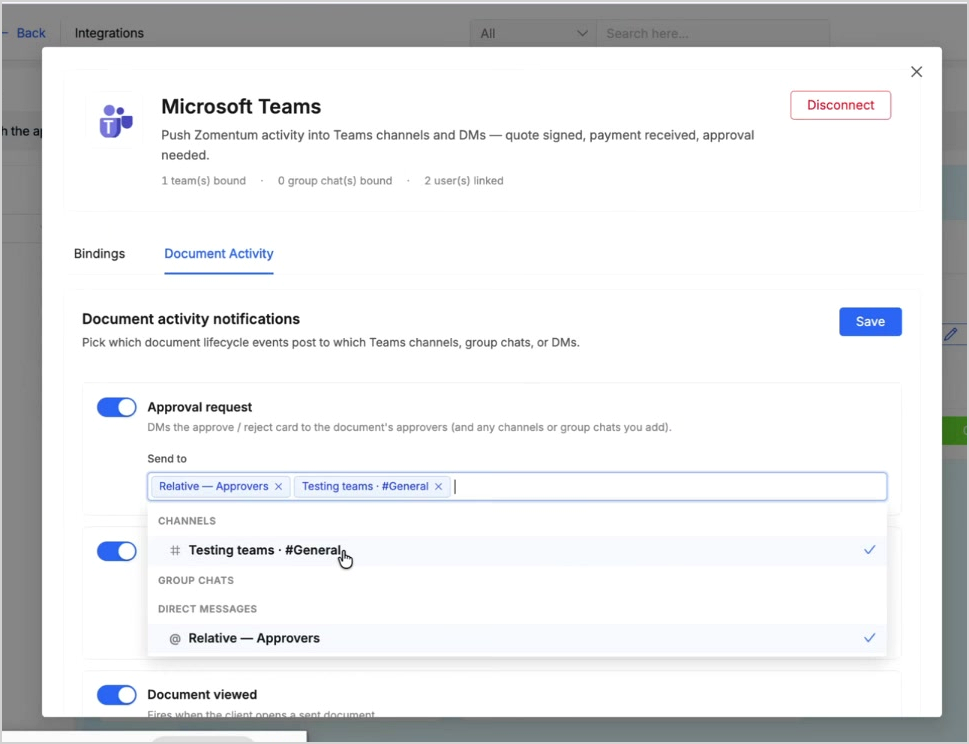
Figure 8. An event can be sent to a relative recipient and one or more shared Teams destinations.
Example configuration
5. Test the integration
Validate the connection with a small, controlled workflow before enabling all events.
Minimum validation sequence
1. Enable Document sent and route it to one test channel or mapped user.
2. Create or use a test document in Zomentum and send it.
3. Confirm that Teams receives a card containing the document name, identifier, client, sender, and View document action.
4. Enable Approval request and route it to Relative — Approvers.
5. Trigger a test approval request.
6. Confirm that the approver receives an actionable card with document details, an optional comment field, View document, Approve, and Reject.
7. Approve or reject the request from Teams and confirm that the workflow is reflected in Zomentum.
8. After validation, enable the remaining events and production destinations.
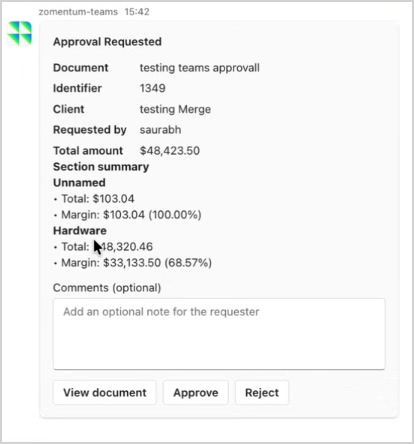
Figure 9. The approval card provides document context and allows an approver to view, approve, or reject from Teams. Demo data shown.
Success criteria
The Microsoft Teams integration shows Connected in Zomentum.
The expected team, channel, or group chat is available as a destination.
Required users display as linked in User Mappings.
A newly triggered test event arrives in the configured destination.
The View document action opens the correct document.
An approval action can be completed by the mapped approver.
No unintended duplicate notifications are received.
6. Recommended routing patterns
Start small and route each event to the team that can act on it.
Configuration principles
Use relative recipients for events that have a clear document-specific owner, such as approvers or the document author.
Use shared channels for events that require team visibility or handoff.
Use direct messages for urgent or personally assigned actions.
Avoid routing the same event to multiple overlapping destinations unless duplicate visibility is intentional.
Review routing after the first week and remove noisy events that do not lead to action.
7. Troubleshooting
Use the symptom-to-resolution table before escalating.
SUPPORT NOTE: Do not immediately reconnect
Before disconnecting and reinstalling, capture the connected tenant, bound destinations, user mappings, event routing, exact timestamp, and screenshots. Reconnection can remove useful troubleshooting context.
8. Frequently asked questions
Can different events be sent to different Teams channels?
Yes. Each document activity event has its own toggle and destination selection.Can one event be sent to more than one place?
Yes. The interface supports multiple destinations, such as a relative recipient plus a shared channel.What is a relative recipient?
A dynamic Zomentum relationship associated with the document, such as the document’s approvers or author. It avoids hard-coding one person for every document.Why is user mapping required?
User mapping links a Zomentum account to its Microsoft Teams identity so direct messages and approval cards can reach the correct person.Does adding the app to one channel add it everywhere?
No. Add the bot to each team, channel, group chat, or personal context that should be used as a destination.Can a customer use a personal Microsoft Teams account?
The demonstrated setup uses the Microsoft Teams admin center and a Microsoft 365 business tenant. A personal account does not provide this tenant-level custom app flow.Can users open the Zomentum document from Teams?
Yes. Notifications include a View document action in the demonstrated workflow.Can approvals be completed directly in Teams?
Yes. The demonstrated approval card includes Approve and Reject actions and an optional comment field.How do we stop the integration?
In Zomentum, open the Microsoft Teams integration and select Disconnect. If the organisation also wants to remove the app from Teams, a Teams administrator or team owner should remove it from the relevant Teams locations.What if the UI labels are slightly different?
Microsoft and Zomentum may update interface labels. Follow the same functional path: upload the app, add it to a Teams destination, pair the tenant, bind users/destinations, configure events, and test.